You know that phrase "I try to take one day at a time, but lately several have ganged up on me at once." That's how I've been feeling. Christmas shopping started late this year. It's a white Christmas Eve and I haven't made a list and checked it twice to see if I'm done shopping. I hope so because Susy Snowflake is tap tap tappin at the window pane and I'm not sure I'll get out today. I'm just on the computer because I'm waiting for my Cricut to finish cutting the last of my tags so I can get the gift wrapping under control.
Don't forget the All Things Spring box of cards will ship to Operation Write Home on Dec 31. I need your cards by Dec 29 so I can get them Tucked Stamped Sorted and Packed for shipping.
Merry Christmas Everyone! May Santa bring those craft supplies you asked
for and may your Holiday Season be safe, warm and wonderful. Big Holiday Hugs to you and yours.
Monday, December 24, 2012
Thursday, December 13, 2012
Hogs and Kisses

Wednesday, December 12, 2012
WMD - Wisdom of the Aged
Years ago my mother recognized that with 7 children and 34 grandchildren, keeping track of birthdays and holidays was going to be increasingly difficult as families grew and age took her memory. So she solved the problem by a) sending money rather than gifts and b) delegating distribution to the parents. It's a brilliant plan really, no one has ever returned the gift because it was the wrong size or color or age appropriateness.
So each year at Thanksgiving Mom writes checks to my siblings and I as the current year's Christmas gift and birthday giving for the following year. When the kids were young I just used the money to buy gifts. Now the kids are on to me; they want the cash. Figures. So I try to find some clever way to gift the money to the kids. This year I made these adorable Toy Soldier Boxes. The cut file and assembly video are free on SVGcuts.com.

I also remind the young uns to send Grandma a thank you card, which has never happened. Lightbulb!...This year I'm going to give each kid an addressed, stamped Thank You card and tell them when they give it back to me with a nice note, ready to mail, they can have their Grandma Gift. I'm feeling a new tradition blossoming. Too bad it took me 30 years to think of it. This is why I talk to myself... I'm only brilliant in complete sentences.
Wednesday, December 5, 2012
WMD - 24 Quick Cards
I got this great idea on Pinterest. It was originally posted on SIMPLY SIMPLE STAMPING with Connie Stewart under the Big Shot tab. You have to scroll down the page quite a way. Connie has a seriously awesome blog. She is a Stampin' Up demonstrator so she posts really clever and lovely crafts; even a pie crust recipe. I went there to get the link for the cards and got lost for an hour. I pinned four or five things before I decided just to pin the whole blog.
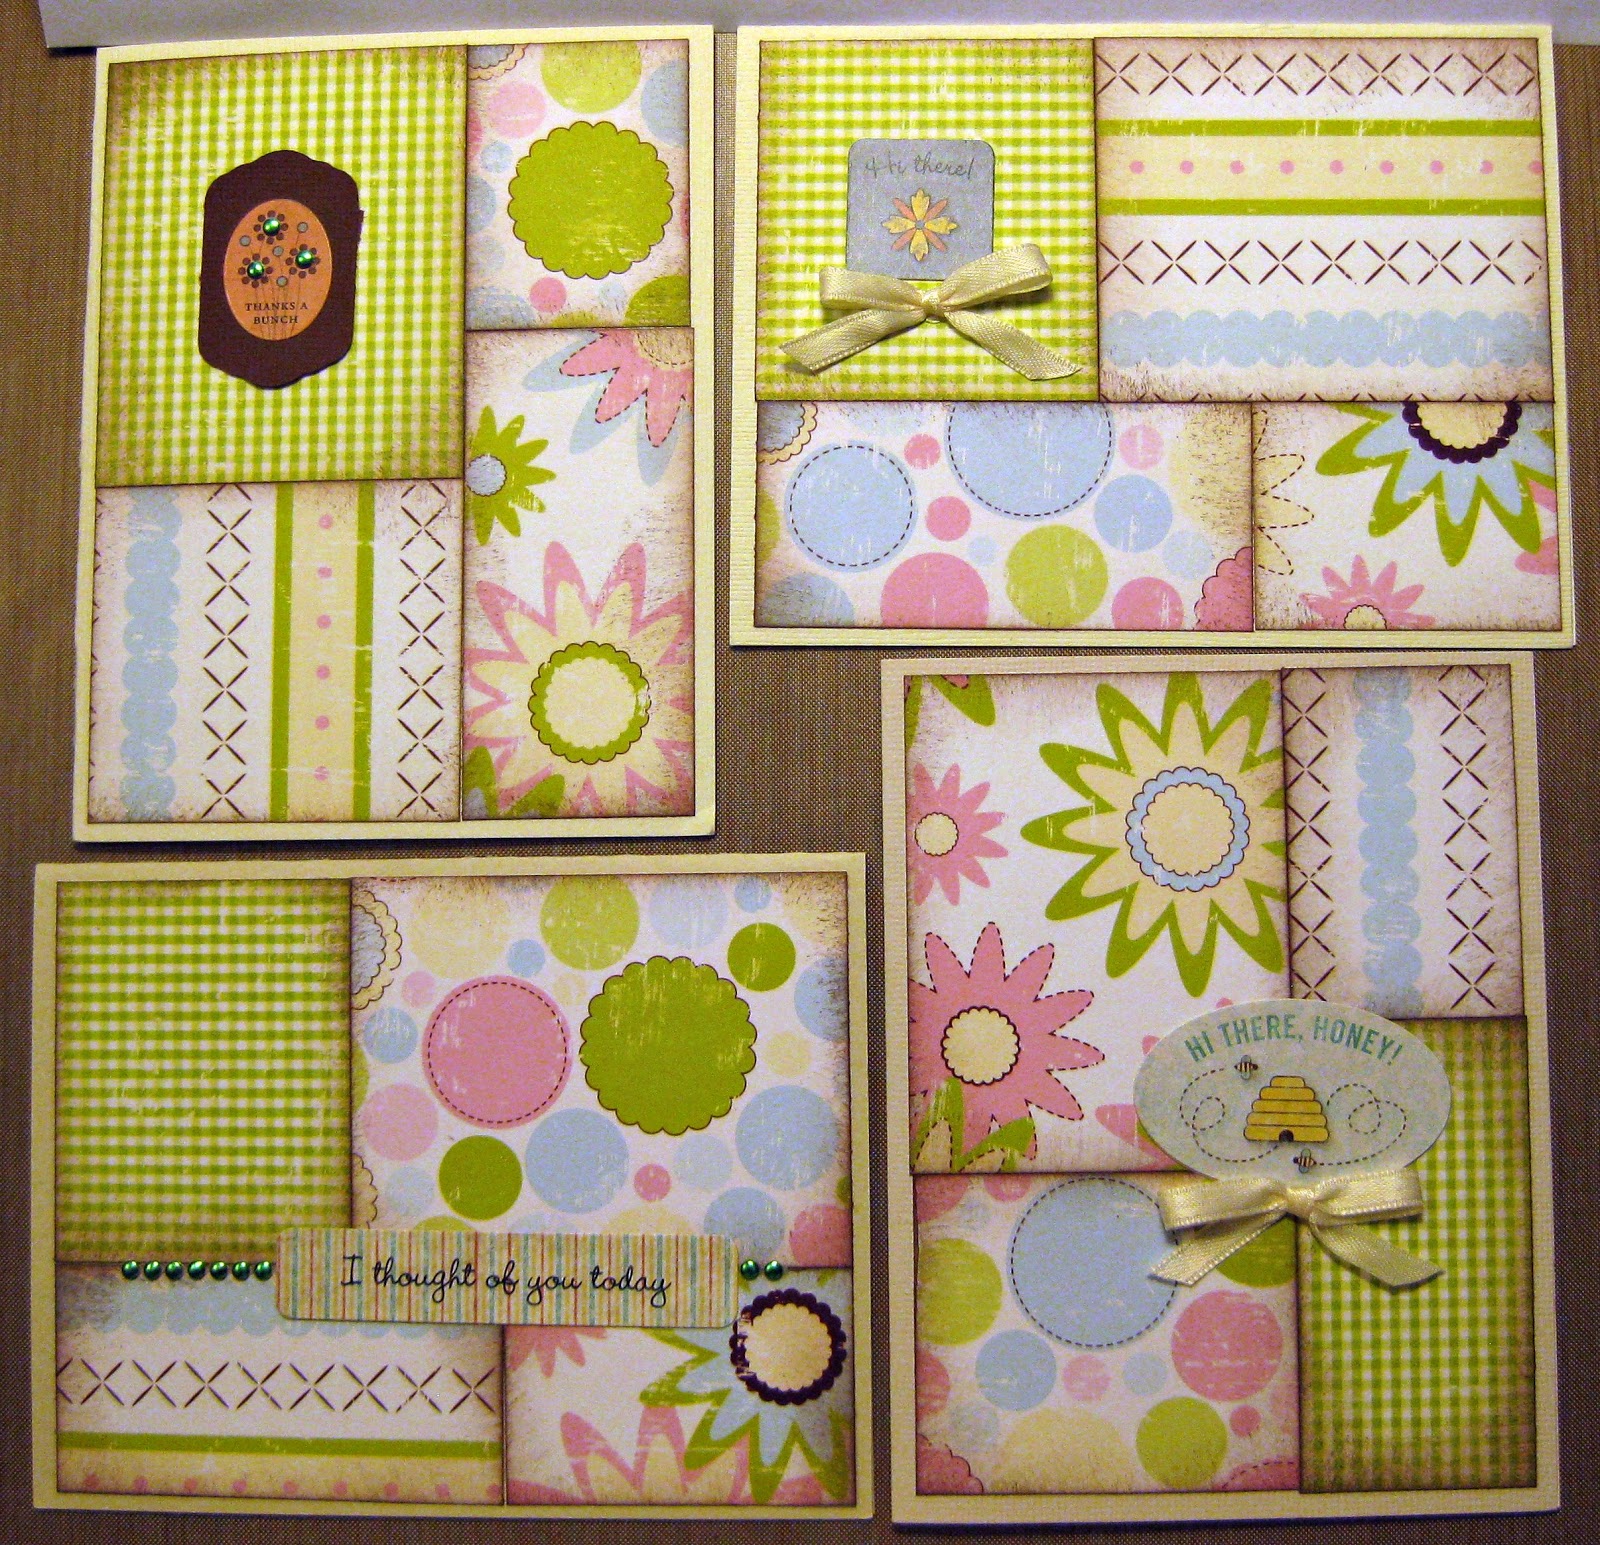
 In one evening I made 24 card faces from four 12x12 sheets of coordinating card stock. If you use double sided you can get 12 cards from two sheets. (You end up with one 1.5x12 inch strip left over from each sheet from which I'll make adorable Spring rosettes.) Use 8.5x11 and get 16 cards from 4 sheets with no waste. You get the idea. A greeting and a drop of bling or a snip of ribbon and you are good to go. Another go-to pattern for using scraps or making quantities in a jiffy.
Wednesday, November 28, 2012
WMD - Rosette Christmas tree

This very cool rosette tree was shown on the Archiver's Online ad a couple of weeks ago. There are printable instructions on their website. Another great project for the Martha Stewart scoring board. This is what I'm making on this Where's My Desk Wednesday. Photo pending...

(updated 12/6/2012) Here's mine. I chose to leave it undecorated. It's a lot smaller than it looks, only six inches at the base and about 10 inches tall; just right for setting on a mantle.
The paper is the O Christmas Tree stack by MME. I love it; so nice and glittery. However, double sided cardstock may have been a better choice. The photo makes me feel like my slip is showing.
Sunday, November 25, 2012
Happy Birthday to the Girl Child

Applebee's style Penne Alfredo
serves 6
Layer in 9x13 pan sprayed with PAM:
16 oz Penne pasta, cooked according to package directions
15 oz jar Alfredo sauce (or two)
*Cooked Chicken
Heat thoroughly in oven.
Serve topped with **bruschetta and shredded Italian cheeses
* Marinate 2 or 3 Boneless/Skinless Chicken Breasts in 1/2 cup Italian salad dressing for 30 minutes. Grill, then cut in strips. OR cut Chicken breasts in to bite sized chunks before marinating. Saute until cooked through.
** Bruschetta: Combine 3 Diced tomatoes, 1T dried sweet basil, 3 minced garlic cloves.
Thursday, November 22, 2012
Happy Thanksgiving

Wednesday, November 21, 2012
All About Me


WMD - Dude! Where's My Desk?

No, I don't live on the East Coast and this is not the result of a natural disaster; FEMA is not on it's way for cleanup. This is my workspace while I'm making cards from scraps. What you see here is the box of small bits I'm using for small bits cards. The boxes of large plain and patterned scraps are on the floor below and the drawers of card sized, and nearly confetti sized, scraps are on the other size of the room with the ribbon. Sometimes I have to create ways to force myself out of my chair so my legs don't shrivel up and fall off. The notepad between the donuts and the Pepsi (Breakfast of Champions!) has sketches of the cards I hope to make today.
Below is the latest contribution from the Perfect Pages Kit remnants. These are the remains of the All Occasion kit. The pinwheel sketch and instructions are on the OWH site and the smile card sketch is this week's I Spy Sketch.
Tuesday, November 20, 2012
ISSC#42

The stamp is from the CTMH Friendship Word Puzzle set. A nice alternative to "Love".
I made the bow on my hand made Bow Easy Style bow maker. The Bow Easy is the greatest invention ever for those of us who are bow challenged. I left the tails long and wrapped them around the element. It lays as flat as a plain knot but gives a little "dressier" look to the simple card. I love that I have a choice of nice bows or cutesie knots. Maybe if I'm a good girl I can talk Santa into bringing me a real Bow Easy for Christmas.
Saturday, November 17, 2012
Rosette Turkeys
Here is my little turkey flock, ready to adorn the Thanksgiving table. I'm not much of a cook so this is my contribution to the celebration. They are based on the Tim Holtz Quirky Turkeys but I used the MS scoring board rather than a die.

I made the bodies/faces from basic shapes on MTC (2 circles and an elongated tear, welded and stretched to 2.25 inches tall for the body, a kite for the beak and half a yin/yang for the waddle.) But if you don't want to make your own, Cricut has several choices or there are some freebies on the web.
Here are cutting measurements to get three turkeys per 12x12 sheet:
Cut paper vertically at 10.25. This will give you a strip to punch circles for stability. Contrary to what Tim says I put one on the front and back of each rosette. It made them easier to glue together.
Cut 3 strips 1.5x10.25
Cut 3 strips 1.25 x 9.75
Cut 3 strips 1x9.25
Punch along one long edge of each of these 9 strips with your scallop edger, score at quarter inches, then follow Tim's instructions.
The rosette paper is from SEI's Nutmeg stack.
Wednesday, November 14, 2012
WMD - Let's go fly a Kite


All you need to make a kite is: dark cardstock at least 4.5x6.5 (I ran out of black scraps and started using pages from a Matstack. It was a perfect fit, no margin for error.) and two coordinating scraps about 1 3/4x4. If they are a little wider they can be a little shorter, and if they are a little narrower you can make your kites a bit smaller. I made one change in the assembly: I glued the top corner then cut it off and brought the scrap down to the bottom corner. That probably won't make any sense until you watch Sandy's video and make your own kite. The kite tut is at the very end of the very informative and inspiring scrap wrangling video.
Monday, November 12, 2012
A Wed Wose - How Womantic.

The lacey oval frame is free at SVGcuts.com.
Saturday, November 10, 2012
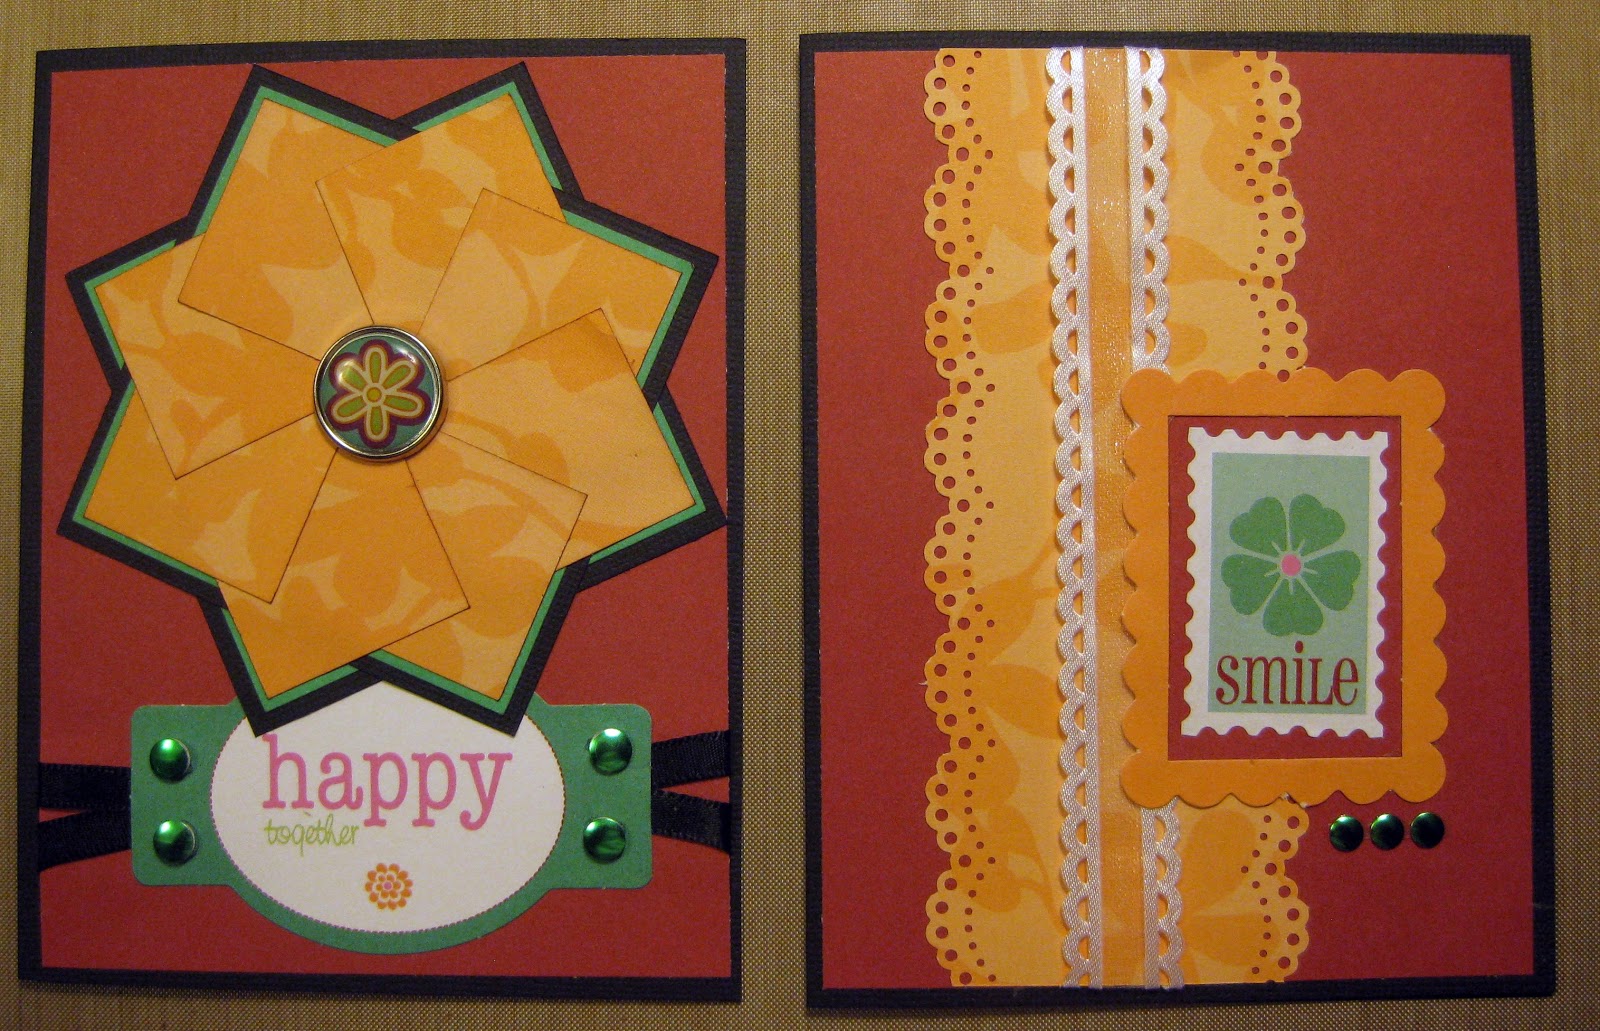
Life is too short to craft with ugly paper
The tutorial for these cool Starburst cards is on the OWH website. Fun, easy and nice to have something different. And as a special bonus the Starburst card is the I Spy Sketch this week. I'm going to post mine for reals this time.

As I was fussing with the remnants of the "Love" Perfect Pages kit I remembered struggling to find a way to make it make me happy when I used it on calendars. All I have left is the solid pink and tan paper that don't match any of the embellishments, which is why I didn't use them in the first place. But I wanted to try the Starburst so I saw this as an opportunity for experimental crafting; if I failed I wasn't out much. As I was finishing up these cards the voice of reason came to me and said, "Let's go watch Vampire Diaries." That Girl Child knows just what to say to lead me astray. So I tossed the ugly paper and most of the embellishments that came with it. I'll do more starburst cards another time with paper I love.

Inspiration
I managed to get 9 cards from the remains of the Colorbok Perfect pages kit, Inspiration. (One got lost in the bits pile and I didn't find it until after the photo was taken. Sorry, no make-up day for blog pix.) I don't use much purple but it is the Hub's favorite color and I liked the combo with the green.

 These three sketches, Pinwheel, Smalls and Gift boxes, were from Sandy's OWH scrap wrangling tutorial aptly named: Using Scraps. Sandy has great ideas, complete with suggested measurements, about keeping card making bits from taking over your world. GO! Watch! DO!
Next kit remains to tackle: LOVE...just in time for Valentines Day. Don't forget the All Things Spring box ships in six weeks.


Next kit remains to tackle: LOVE...just in time for Valentines Day. Don't forget the All Things Spring box ships in six weeks.
Wednesday, November 7, 2012
WMD - Back to the Future

ANYWAY... there remains a pile of matchy paper bits and elements just ripe for cardmaking. I promise to use everything I can and toss the rest.
Monday, November 5, 2012
Bits only a crazy person would keep
You know I occasionally refer to my scraproom as a landfill because it is stuffed full of "stuff", much of it inaccessible because of the sheer quantity. I really am trying to gain control of it a bite at a time. Last week I was working on the never ending project of getting scraps under control. I found a drawer in one of my towers labeled: "Bits only a crazy person would keep." That about sums up my hoarding issues.

I find myself on the lookout for sketches for cards that use small scraps of paper. I hate throwing them out but I also don't want them hanging around. Here is a nice sketch from Valerie Salmon. It was chosen as the sketch for the DCWV design challenge for November 2, 2012. Go check out the samples, grab some of your own scraps and get 'er done!


I find myself on the lookout for sketches for cards that use small scraps of paper. I hate throwing them out but I also don't want them hanging around. Here is a nice sketch from Valerie Salmon. It was chosen as the sketch for the DCWV design challenge for November 2, 2012. Go check out the samples, grab some of your own scraps and get 'er done!

Thursday, November 1, 2012
Reverse Nestablilites
Have you met Gina K. at GinaK Designs/ StampTV? No? Well now's your chance. As I've cruised YouTube, astonished at the amazing things people do with paper, Gina's videos keep popping up. She makes beautiful cards and makes it look so easy. For example, in this video she demonstrates a technique she calls Reverse Nestabilities. Turns out I don't own any Nestabilities, but I do own Make-the-Cut. So I just used similar shapes to create a cut file for the same effect.
 The card on the left is the Reverse Nestabilities technique. If you look closely you can see that the whole card front is popped up so only the bottom layer of the butterfly and the sentiment are actually on the card. Pretty cool. The card on the right uses the leftover cutouts. Easy, clever and I got 8 cards from 3 sheets of paper, butterflies included.
Credit where credit is due: Paper and Ribbon is American Crafts. Stamps are Fiskars. Butterfly svg is SVGcuts.com from the Cheryl's cute bugs collection.

Wednesday, October 31, 2012
WMD - Trick or Treat
My job has moved to a new building just around the corner from O My Crafts. Will Call is just like Trick or Treat: you go to the door, say the magic phrase and walk away with a bag full of goodies.
 This is what I got today at O My Crafts for around $20. Imaginisce Glam Rocks, Martha Stewart scoring board, 29 packages of Making Memories Bravissimo! sentiment packs, Making Memories Halloween stamps. Add to that a "25% off any online order" coupon code (OMC25). TRICK OR TREAT!

Monday, October 29, 2012
Lucky to Know You
This is the I Spy Sketch this week. It's simple but they have done some lovely things with it. Check it out HERE .Then grab a bundle of scraps and make a card. Easy! It's a nice sketch to show off your cute paper and a fun element.

I think Leprechauns should have as much gold as possible so I heat embossed the clover for good measure. I'm loving this ribbon for OWH cards. I got it at JoAnn's. It's metallic so it sparkles, but it doesn't flake because it's not glitter. Love it.

I think Leprechauns should have as much gold as possible so I heat embossed the clover for good measure. I'm loving this ribbon for OWH cards. I got it at JoAnn's. It's metallic so it sparkles, but it doesn't flake because it's not glitter. Love it.
Saturday, October 27, 2012
Pemberly Done
I finally got my CTMH Pemberly kit done. It only took 4 months. Sadly that may be a record for me.

I didn't ink any of the cards. I thought the paper was busy enough that it wasn't necessary. I inked the layouts and didn't think it added enough interest to justify the extra effort. What do you think?


Wednesday, October 24, 2012
WMD - Lo-tech saves the day
NASA spent a billion dollars to develop a pen that could write in space. The Russians used a pencil. I think sometimes we just make things too hard.

We, that is to say Ju, J9 and I, ordered this Pemberly class from CTMH in July. I've only completed one layout so I have the other layout and card set on my desk staring me in the face with an accusing look. I'm really not neglecting them. I just can't find my Paper Blossoms tools. I finally broke down and used the back of a pen to shape my flowers.

We, that is to say Ju, J9 and I, ordered this Pemberly class from CTMH in July. I've only completed one layout so I have the other layout and card set on my desk staring me in the face with an accusing look. I'm really not neglecting them. I just can't find my Paper Blossoms tools. I finally broke down and used the back of a pen to shape my flowers.
Stuffed Zucchini
I haven't cooked in so long I wondered if I still could. But I did, not just once, but two days in a row. Tonight's Stuffed Zucchini 2 turned out de-lish. I'm blogging it so I remember to make it again. The review from DS3 was "Surprisingly good for what it had in it."
 **********************
Stuffed Zucchinni 2
1 med Zucchini cut in bite sized chunks, blanched
2 cups cooked Spaghetti squash (or whatever amount you have left over from a previous meal, this kept the cheese from disappearing into the zucchini creating a super tasty cheese layer without gobs of cheese.)
Salt/Pepper if you want
1 cup shredded cheese
Parmesan cheese to taste, I used a couple tablespoons.
Tomato sliced thick
1 box Stove Top stuffing, prepared according to package.
Layer in a buttered 2 quart casserole. Bake at 400 about 30 minutes or until hot through and crispy on top.
*************************
If you wonder what Stuffed Zucchini 1 is, it just the Zucchini and Stuffing prepared the same way.
Thursday, October 18, 2012
Card game #3 - Tutorials worth reading
This tutorial on the Greeting Farm is a great one for photographing cards. Lesson one is Learn Your Camera. I've tried to read my camera's manual several times but got bogged down in the techno babble. Jen has broken down the things you need to know so you are not trying to remember EVERYTHING.
Now, if I were a camera manual where would I be?...
And Here is another fabulous tutorial on how to use up an entire 6x6 paper pad to make cards. It's pretty cool and the theory can be adapted for any set of papers you are working with. I don't know where the original post is but it's reposted on OWH. The basic idea is that you find a sketch you like and make as many cards as you want. Then you find a sketch that uses the size of scraps you have left over and make as many of those cards as you can stand. Repeat until everything is used up (or you can't stand to look at the same papers ever again.) The sketches on OWH have dimensions so you can choose your sketch according to what you have. I think it's brilliant. Thanks Kristy.
So here is the card game: grab a couple of coordinating scraps, find a sketch that requires pieces that size and try Kristy's use it 'til its gone principle. You don't even have to use a sketch if you don't want. Just use up a bundle of scraps.
I'll post what I come up with...as soon as I can find my desk. (It's currently buried in a CTMH workshop I haven't finished.)
Wednesday, October 17, 2012
WMD - Witchy pops
With Christmas cards done in September and Spring Cards on my desk I was starting to get a bit season confused. I thought a quick Halloween craft might fix me right up.

This cute and easy to assemble Witch hat SVG is free over at SVGcuts.com. I cut 8 per 12x12 sheet of double sided cardstock. I made 24 of them in an evening. Three sheets gave me lots of variety. Inking the edges took most of the time but is totally worth the effort. It's a treat that looks like you fussed, only without the fuss. How can that be bad?!?

This cute and easy to assemble Witch hat SVG is free over at SVGcuts.com. I cut 8 per 12x12 sheet of double sided cardstock. I made 24 of them in an evening. Three sheets gave me lots of variety. Inking the edges took most of the time but is totally worth the effort. It's a treat that looks like you fussed, only without the fuss. How can that be bad?!?
Sunday, October 7, 2012
Lamps and the Girl Child
The announcement in General Conference that the age of missionary service for young women has been changed from 21 to 19 (and from 19 to 18 for young men) makes me realize that my lamp of preparation is not only empty, but there seems to be a layer of dust on the bottom.
I served a mission. It was a wonderful experience that I've treasured all my life. I've always held a hope that the girl child might want to take that opportunity, but this announcement advances the timeline dramatically. Suddenly the moment for her to decide if she'll serve is not some vague year in the future; the time is NOW. She will be 19 next month. While I'll be delighted if she decides to serve, I'm not sure I'm ready to let go.
I served a mission. It was a wonderful experience that I've treasured all my life. I've always held a hope that the girl child might want to take that opportunity, but this announcement advances the timeline dramatically. Suddenly the moment for her to decide if she'll serve is not some vague year in the future; the time is NOW. She will be 19 next month. While I'll be delighted if she decides to serve, I'm not sure I'm ready to let go.
Thursday, October 4, 2012
Lucky Card

WMD - The Bird has Left the Nest

Tonight I'm counting, sorting and bundling. I was surprised to discover that we didn't actually reach the goal of 350 cards. I judged our progress by the filling of the box. We ended up with 289 cards and the box was FULL FULL FULL! I could have fit 11 more in to make an even 300 but there is no way I could have fit 350 as planned, and I'm pretty darn good at puzzles.
Monday, October 1, 2012
It's a brand new Season! SPRING!
It's time to start a new season of Operation Write Home cards. The "Christmas/Winter" box is filled to overflowing which gives us a little head start on the new box. I know it seems a little odd to be setting aside Christmas on the First day of October, but here we go anyway.

This is the first set of cards I've made for the "All Things Spring" box that will be shipping out in December. You can get the SVG for the Doily (posted 9/21/2012) and the Happy Birthday 2U (posted 9/10/2012) at birdscards.com. I welded the circle sentiment inside the doily and multi-layered the mat so the sentiment sits up off the card. Bird has great FREE cut files and digi stamps on her site. And she makes FABULOUS cards. It's worth going to her site just to look at her beautiful work.
My goal is to learn to use digi stamps so I don't have to try to cut sentiments. I got quite frustrated with these. I blame much of it on the off brand cutting mats I used (by Simply Crafty) which have proven disappointing beyond words.
Enjoy this lovely Fall weather...but make cards for Spring.
Friday, September 28, 2012
CTMH - Pear and Partridge

Wednesday, September 26, 2012
WMD - Cards and More cards

If you have any more cards to add to this shipment, I need them this week. And if you are willing to donate dollars toward shipping that would be appreciated too.
My next box will go out late December with Valentines, St Pat's, Easter and all that is Spring related. We also need Birthday, Thank You, Missing You, Thinking of You, General and Blank cards.
Now I'm off to celebrate the Hub's Birthday. Happy B-Day darlin'. Who loves you most?
Friday, September 21, 2012
Fat Penguin...something to break the ice.

I used the arms from the frustrating download. The wings for both birds are flower petals, as are the penguin toes which I welded to circles for gluing. I borrowed the hat band from the Mad Hatter which is a free file over at SVGcuts.com. Everything else is just from the basic shapes file on MTC. Even the hat was easier than I expected. It's just two ovals and a trapezoid that I mashed, squashed, stretched and welded until it made me happy. It doesn't take much to make me feel accomplished.
Wednesday, September 19, 2012
WMD - Don't Blink
(The Hub just walked in and said "Hey! Your desk is black!" Followed by "Have I ever seen that cutter?" To which I responded, "Not for a while." Truth is it hasn't moved from that spot since the desk was built, it is usually just buried in paper scraps. I don't think he's ever realized it's a cutter.)
Our very first Operation Write Home shipment will happen next week. Our goal was 350 cards. If you have cards to donate make sure I have them by Sept 30. I'm pretty sure we'll make our goal and have some cards that will have to wait until the next shipment scheduled for December. That makes me super happy.

Tuesday, September 18, 2012
Downloading frustration.
No I didn't need more frustration so I found some to download.
I have this winter card in my mind but it requires just the right snowman. I finally found him but I can't get him to download. All I get is his arm. REALLY? what good is just an arm? I guess I'll just have to wing it. It shouldn't be impossible since he's mostly just circles. But he wears a cute hat that maybe I can find somewhere else. And he has cute offspring, a penguin and a robin. SO this is me off to recreate the file of someone who actually knows how to make files.
You can see the ADORABLE originals here and learn why I can't use just any snowman.
http://inmy-craftroom.blogspot.com/2011/11/christmas-card-cut-files-mtc-svg.html
Friday, September 14, 2012
Card game 2.1
How did card game #2 go? Did you
get all scraps into useful little cardmaking bundles? No? me neither.
But I got some of them, mostly plain cardstock. I kept getting
sidetracked by making cards out of the scraps I was supposed to be
bundling. I suppose that's really the goal anyway so it's ok.
Card
game #2.1 goes like this: Go through your little bundles of patterned
paper. Find your most wintery paper (not Christmas) and make a card. You
can add whatever plain cardstock or embellishments you want. The only
rule is to make a winter card from your scraps. Pretty easy rules.

The vertical card on the right was created from this sketch http://ispysketches.blogspot.ca/2012/09/issc32-with-marie-alice.html posted on I Spy Sketches 7 Sept 2012.
Wednesday, September 12, 2012
WMD - Don't try this at home
I missed WMD last week, but I had a very good reason. You see... the girl child made me do it. A friend recommended she watch the previous seasons of Vampire Diaries. That sounds like a show that I could enjoy so I watched it with her. We watched 2 seasons last week. We couldn't help it....we just got SUCKED in!!! Bwahahah! see how I did that? Vampires...sucked in!
Yeah I know...go work on cards.

I'm astonished and a little embarrassed at how often my computer keyboard becomes my crafting workspace. I guess that's because I love svg's but I also like to look at what I'm building after I get the bits cut out. I'm absolutely positive that one day I'm going to be really, REALLY sorry I do this. Once again, another project for another day: make room on my desk for my computer AND my crafts.

I got this adorable free SVG Reindeer from DieCutGirl.blogspot.com posted April 1, 2012. The original doesn't look as angry as mine. It has to do with the placement of the eyebrows. In spite of the reindeer wearing his angry eyes, I think the cards turned out adorable.

Tuesday, September 11, 2012
OWH progress
Hey all you lovely card makers!
I'm just checking in with progress on our OWH box. Our goal was 350 cards by the end of this month as I recall. I have over a hundred fabulous cards sitting on my desk waiting to be "stamp and tucked". I'd love to take credit for making all of them but many of them have been donated. So, thanks everyone for that.
I'd love it if you'd post how many you have ready. And if you want to donate you can bring them to my house or Juleen's house (don't you love how I volunteer her for stuff like that?) and we'll get them in the box. And if you can't donate cards...I'd be happy to accept dollars toward shipping. :-)
The shipping date for these to be in Washington to be sorted and mailed overseas is early October. So I thought it might be fun to have a stamp and tuck party at the end of September. Don't know what "stamp and tuck" means? Every card needs to have the words "Operation Write Home" on the back and be tucked into an envelope in a specific way. I've ordered a stamp with the OWH logo that should be here in a couple days, and I made labels for any cards that a stamp won't show up on. I also ordered 1000 envelopes that should be here next week. So if you have cards to donate that don't have envelopes, we got yer back.
 These are today's fare. I made 6 of them. I know I've made gobs of cards of this same pattern. But I love it because it is quick, easy, creates nearly no waste and I think they are super cute.
I'm just checking in with progress on our OWH box. Our goal was 350 cards by the end of this month as I recall. I have over a hundred fabulous cards sitting on my desk waiting to be "stamp and tucked". I'd love to take credit for making all of them but many of them have been donated. So, thanks everyone for that.
I'd love it if you'd post how many you have ready. And if you want to donate you can bring them to my house or Juleen's house (don't you love how I volunteer her for stuff like that?) and we'll get them in the box. And if you can't donate cards...I'd be happy to accept dollars toward shipping. :-)
The shipping date for these to be in Washington to be sorted and mailed overseas is early October. So I thought it might be fun to have a stamp and tuck party at the end of September. Don't know what "stamp and tuck" means? Every card needs to have the words "Operation Write Home" on the back and be tucked into an envelope in a specific way. I've ordered a stamp with the OWH logo that should be here in a couple days, and I made labels for any cards that a stamp won't show up on. I also ordered 1000 envelopes that should be here next week. So if you have cards to donate that don't have envelopes, we got yer back.
Sunday, September 9, 2012
Rotate Picture!

Saturday, September 8, 2012
Card Worksop Part 2

Anyway... here is the second set of the CTMH Just Because card workshop. I thought they turned out nice.
The other thing I learned is, for the OWH project I'm working on it would have been MUCH more energy efficient to have made 20 cards all alike of each design and it probably wouldn't have used any more paper per card.
The patterned paper I used was from the BoBunny Father Christmas collection. LOVE IT! I wish you could see it better. Maybe when I learn how to rotate the pic I'll retake it too (insert rolling eyes here). Stamps are CTMH.
Monday, September 3, 2012
Just Because Card Workshop
I've been working on the CTMH Just Because card workshop published in the CTMH Wishes book. The idea is to make 20 cards (2 each of 10 designs) from 6 sheets of cardstock + bases. This is my analysis:
It took a couple days to cut all the bits but I did it on the first try. Go me! I had to use a magnifying glass to see the measurements. I tried to enlarge it on a copier but they didn't copy well enough to read. I blame the old eyes, not the new copier.
I don't know what brand the white paper is that I'm using but it does not stamp well. It doesn't absorb the ink so it kind of runs and can smear if you don't let it dry for a few minutes. That slows the process down. The cards are turning out nice. I'm only half done but here is a view of the first 5 designs.
Wednesday, August 29, 2012
WMD Embellishment Central
OK, so today's photo isn't my desk. But I wanted everyone to see the very cool printer the Hub got me for my birthday. It is wireless so it doesn't have to live on my desk. I can even print from my phone. It also has a copier, color or b/w. I'm so excited about it I can hardly stand myself. And because it doesn't have to live on the desk, it gets to live behind the desk in embellishment central...another space in my world that needs attention. Ah well...projects for another day.

Tuesday, August 28, 2012
Microsoft Rant
Does Microsoft make anyone else cRaZY? Every Microsoft product since Windows had been completely not user friendly - at least not when I'm the user. Example: I needed to make labels for my OWH cards. I've tried to make labels on Word in the past and thought I'd skip that nightmare. I went into Word Perfect, spent 5 minutes creating a label and low and behold...my new printer won't talk to Word Perfect. So I grudgingly signed in to Word (grumble grumble). Then spent HOURS figuring out how to make a sheet of labels only to discover that the program doesn't save labels after you print them, or at least I couldn't figure out how to make it happen. So every new sheet of labels had to be redesigned from the ground up. It took me another evening of HOURS to print 5 sheets of labels in two different sizes, one of which Microsoft no longer recognizes, so I had to create it as a custom label. THEN it would not let me name it myself. So my "Custom Label" wears a name that belongs to a label that already exists and I don't even know how it happened.
I accept that I'm mostly computer illiterate. Fine. But I've had to use MS Word for years and I still can't get the feel for it. GAH!!!!!!
Thanks for listening. Now back to your regularly scheduled program of cardmaking.
I accept that I'm mostly computer illiterate. Fine. But I've had to use MS Word for years and I still can't get the feel for it. GAH!!!!!!
Thanks for listening. Now back to your regularly scheduled program of cardmaking.
Sunday, August 26, 2012
Anniversary #29 at Silver Creek Lodge
Our last vacation with just our family was so long ago none of the kids could remember it without memory ticklers. We finally figured out it had been about 10 years ago and the previous one 4 years before that. So it was time.
The Hub searched for DAYS to find just the right spot. He finally got in on a cabin that had experienced a last minute cancellation so we got it for a reduced price. (The only price worth paying!) The cabin itself sleeps 18 and had a separate bunkhouse that we obviously didn't need. Everyone who wanted their own room had it. The beautiful lodge left no room for boredom with a pool table, air hockey, foosball, an X box and even a home theater room with a projector screen. Outside there was a hot tub, volleyball and wildlife watching. My favorite part of the weekend was having no agenda and just striking up whatever game would strike someones fancy. And of course a party ain't a party without great food. So we played and laughed and ate and enjoyed each other all weekend long.
I adore my family. Thanks everyone for a wonderful weekend!
Happy Anniversary to the Hub. Without you, nothing else matters. You truly are the center of my universe.
Thursday, August 23, 2012
Oreo Truffles
For a while now, I've wanted to try my hand at cake pops. I even bought all the ingredients, right down to a cake pop stand. But I could never envision how to dip them in the chocolate coating to make them work. Then last night the girl child decided to make Oreo Truffles to share at the "last day party" for our boss. It seemed like a harmless venture to her, since she has never shown an interest in anything culinary. So off she went to buy the ingredients. She crushed the Oreos, mixed in the cream cheese, formed the little black balls and was ready to dip. I took the job of melting the chocolate. After it turned into a solid blob of yuckiness I got on the interweb and read "how to melt chocolate for dipping". I had done it too fast and too hot so I added vegetable oil to thin it down enough to smear it around on the cookie balls. I was sure they would not solidify because of the amount of oil I added. An hour later, with Oreo crumbs covering every surface of the kitchen, we stuck the ugly little goo balls in the fridge and hoped they would set up enough to handle by morning. An overnight miracle turned them into a tasty, if not beautiful, treat.
 from Allrecipes.com

Ingredients
- 1 (16 ounce) package OREO Chocolate Sandwich Cookies, divided
- 1 (8 ounce) package PHILADELPHIA Cream Cheese, softened
- 2 (8 ounce) packages BAKER'S Semi-Sweet Baking Chocolate, melted
Directions
- Crush 9 of the cookies to fine crumbs in food processor; reserve for later use. (Cookies can also be finely crushed in a resealable plastic bag using a rolling pin.) Crush remaining 36 cookies to fine crumbs; place in medium bowl. Add cream cheese; mix until well blended. Roll cookie mixture into 42 balls, about 1-inch in diameter.
- Dip balls in chocolate; place on wax paper-covered baking sheet. (Any leftover chocolate can be stored at room temperature for another use.) Sprinkle with reserved cookie crumbs.
- Refrigerate until firm, about 1 hour. Store leftover truffles, covered, in refrigerator.
Subscribe to:
Posts (Atom)